Please read, before reading

I am saddened by the comments on this blog that often take a judgmental turn. The information is intended to be just that -- information. You need to make your own decisions for your life and be accountable for your actions. I debated closing the blog, but feel there are many valuable items listed for families struggling with food allergies, especially early on.

If you need further information please contact a doctor. If you need to verify a product's ingredients, please look at current labels and contact the company yourself. Note many posts are several years old. Use your best judgment and do not make up comments to scare people.

Tuesday, December 29, 2009

Dairy Alert

I recently contacted Road's End Organics to find out if there is any dairy in their products, specifically their Mac & Chreese.  Here was the response:

Thank you for your email.  There is dairy ONLY in the prepouched chreese mix for Road's End Organics Mac & Chreese.  There is dairy present on the same manufacturing lines and in the plant where Road's End Organics Mac & Chreese is produced.  The manufacturing lines are thouroughly cleaned before our product is run.  There are no peanuts or tree nuts on the same manufacturing lines or in the plant where Road's End Organics Mac & Chreese is produced.
Be warned just because it says dairy-free, it still might not be.  Be sure to check out my mac and cheese recipe!

New Recipe -- Dairy-Free Macaroni and Cheese

Okay, so now that my daughter has been going to a drop-in daycare (where there is no real food) she is learning all sorts of new things.  Of course there is dramatic play in a play kitchen where they serve pretend pizza and macaroni and cheese.  We have a good pizza option, in fact she eats it all gone.  But for mac and cheese I just haven't found a good prepackaged one and using vegan gourmet cheese usually gets wasted because it gets moldy so quickly.  I searched the Internet and couldn't come up with anything that wouldn't require a trip to Whole Foods.  So the other day, I was thinking about parmesan cheese and came up with this idea.  Now, I don't know if it tastes good to those who eat dairy-free food, but I do know that my daughter ate a good portion tonight.  That means it has to taste pretty good if she's going to actually eat it.  Here's what I did and I linked all the products that I used.  I use these products regularly so I feel this recipe is a good option for us.  If you have a good mac and cheese recipe to share, feel free to post in the comments.

Dairy-Free Macaroni and Cheese
(This serving size is small and makes about 1 cup cooked)

2 Tbsp dairy-free butter (I used Earth's Balance because I like how it melts)
2 Tbsp flour
1/4 tsp salt
1 cup original rice milk (I buy the individual 8 oz containers that can be stored in pantry)
2 Tbsp Vegan grated topping (I also use this on top of toast and abc spaghetti)
1/2 cup macaroni
1 cup vegetable stock (optional)

1. Melt butter on medium in saucepan.
2. Add flour and salt.
3. Slowly add milk. Bring to boil.  Stir constantly.
4. When sauce thickens reduce heat to low.
5. Stir in vegan grated topping.
6. Boil macaroni for 8 minutes in vegetable stock or water.
7. Mix macaroni and sauce together.

**I added a couple tablespoons of the vegetable stock to the sauce after the macaroni was cooked.  This is optional.**

Thursday, December 24, 2009

HAPPY HOLIDAYS

I'll be taking a short break from blogging for the next few days.  Have a safe (and reaction free) and happy holiday!

Monday, December 21, 2009

New Silk Soy MIlk coupon

Go here to print a 75 cents off Half Gallon of Silk Soy Milk!

Monday, December 14, 2009

Be Sure to be reading my other blog

I've got lots of fun ideas posted for ideas for the holidays on my other blog, Reflections from a Mother's Soul.  Be sure to check it out!

Homemade Clay Ornaments

Here's a really easy ornament idea for kids with allergies.  I don't know about you, but I just have such a hard time trusting store bought clays and doughs.  Mostly because my daughter is so young and it ends up in her mouth no matter how many times we discuss that it's not for eating.  And with the allergies, you never know what might end up in the clay or dough.  I'm sure there aren't any regulations to list allergens on those kind of products.

Here's the recipe for homemade clay.  It make a lot. You can easily half it or store what you don't use in a zip-lock bag.  I'm not sure how long it will keep, but I would imagine at least a month.

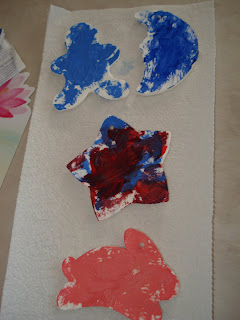
Before we started, we looked at our Christmas tree and decided what was missing -- a moon, a gingerbread boy, twinkle star and a bunny.  We also made a handprint ornament for Daddy that we are keeping white -- it's didn't photograph very well, but turned out pretty nice.

Play Clay
1 cup cornstarch
2 cups baking soda (1lb box)
1 1/4 cup water

1. Mix cornstarch and baking soda together in saucepan.
2. Add water to cornstarch and baking soda.
3. Bring to boil on medium heat.
4. Stir constantly until mixture is consitency of mashed potaoes.
5. Remove from heat immediately and put on a plate.
6. Cover with damp cloth.
7. When dough cools, roll it out to 1/4 inch on wax paper.
8. Use a cookie cutter to make shape.
9. Poke hole in top for string to add to hang from tree. I used the other end of a small paint brush.  A pin or toothpick would work, too.
10. Allow 36 hours to dry depending on thickness. To speed up, turn oven up to 350 degrees.  Place ornaments on wire rack or in cardboard box on rack.  Leave in oven until oven is cool.
11.  Leave white or paint with paint.


Yes, my 2-year-old painted these all by herself (I'm so proud).  I stood back and watched.  She was delicate with the ornaments and painted them really nicely.  I was surprised on how deliberate she was with her strokes and choice of colors.  I tried to get her to choose a couple other colors.  But she only wanted red, pink, blue and another blue (I mixed white with blue).  I'm guessing she had a vision.

**You can also add food coloring to water before mixing it with cornstarch and baking soda**

If you are familar with clay projects, there are a lot of different items you can make.  In the past I used this clay to make a pinch-pot, which is fun to do with kids.  Since there is no baking it's really nice, especially if your resources are limited.

Be sure to check out my other toddler-friendly ornament idea here!

Wednesday, December 9, 2009

Snack idea -- Gingerbread house


So I had this elaborate plan to use this dairy-free frosting to make a gingerbread house with my 2-year-old. Well, we didn't succeed.  One, I'm really not that crafty, although I try.  Two, she couldn't help but lick her fingers every two seconds.  And three the frosting wasn't that good of a glue.  So, as I looked at it I realized we could still make a house that would meet my little one's standard.  Note no assemble required.  It was almost like decorating a cookie.

Materials
graham crackers
knife
frosting (we love this recipe)
dairy-free chocolate chips
fruit snacks
gummy worms, cut up (I bought these at Target for 99 cents-- the gumdrops were too big for my daughter to eat and were almost $4.)
Any other favorite little snacks


Directions
1. Cut graham cracker so it has a peak to look like a house.
2. Put frosting on the graham cracker -- be sure to let your little one do this.  I used the other end of a plastic spoon as a knife, so she could safely frost the  house.

3. Put candy/decorations on frosting.
4. Eat up.  I let her eat it right away.  She demonstrated so much restraint decorating that I had to reward her with the tasty treat!


Monday, December 7, 2009

Yummy Dairy-Free and Egg-Free frosting

Wow!  This was the best frosting I've tried yet.  Even if you don't have to be dairy-free, you should really try it. I found it here and followed the directions exactly.  It tasted so good I didn't make any adjustments.  And it was definitely toddler approved!!


Dairy-Free and Egg-Free Frosting

2 cups powdered sugar
2 Tbs melted dairy free margarine (we used Earth's best)
1 tsp vanilla
1/4 c dairy free shortening
4 tsp vanilla soy milk 


Mix with mixer for five minutes.  Use food coloring if desired.  


For more great recipes, check out the Grocery Cart Challenge!

Thursday, December 3, 2009

Dairy-free and Egg-Free cutout gingerbread cookies


It's so hard to find tasty baked good recipes for everyone.  It's just too much work to make two sets of cookies dairy-free and regular dairy-based cookies.


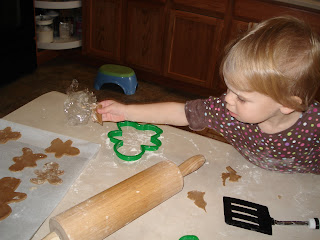
I found a really good recipe for cut out gingerbread cookies that do not have milk, butter or egg in them.  Yes, you can taste what's missing.  But once you add the frosting, it balances out really well.  What I most liked about this recipe is that the dough was really easy to work with and that my 2-year-old could help me with no worries.  Hooray!  I also liked that this recipe didn't have any odd ingredients that I would have to purchase.


Cutout Gingerbread Cookies
(original recipe found here)

2 cups flour
1 1/2 tsp cinnamon
1 1/2 tsp ground ginger
1/2 tsp ground cloves
1/2 cup shortening (I use Crisco)
3/4 cup brown sugar
6 Tbsp hot water (I just have a measuring cup full of hot water and scooped out Tablespoons as needed)
1/2 tsp baking soda

1. In large bowl, mix flour, cinnamon, ginger and cloves.  Mix with fork or whisk. Set aside.
2. In mixing bowl add shortening, brown sugar and 3 Tbsp hot water. Mix in mixer on medium.
3. In a cup mix 3 Tbsp hot water and baking soda. Add to shortening mixture.
4. Add flour slowly to shortening mixture.
5.  You may need to add more hot water if dough is crumbly.  I added about 3 Tbsp more.
6. Split dough in half and make two thick patties. Wrap in plastic wrap for 1/2 hour to 1 day.  (I made my dough after making dinner one night and we rolled it out the next morning -- worked out really well.)
7. Roll out dough on lightly floured surface.  Use cookie cutters to make shapes.
8. Place cookies on parchment lined paper.
7. Bake at 350 degrees for 8 minutes or until done.


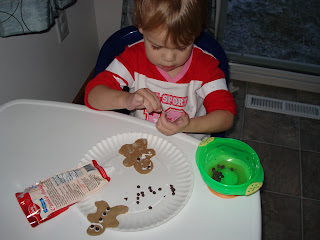
**For frosting these I just bought a Betty Crocker frosting tube and used Enjoy Life chocolate chips for the eyes and buttons.**


Cooking with a Toddler Tips:

  • Be prepared.  Have a game plan in mind.
  • Do as much prep work ahead of time before telling your toddler you're ready for them.  Have everything ready -- line cookie sheets, clean cookie cutters, clear work space.
  • Plan for it to take longer than you anticipate (and it should if your toddler or child is actually helping).
  • Give them a job right away.  As I dusted the counter I had her move the flour around.  As I was moving the cookies to the cookie sheet, I gave her dough to manipulate.   Keep finding little jobs so they don't get bored.
  • Don't get upset as you watch them brush flour on the floor.  It can get cleaned up.
  • Have a wet paper towel or washcloth nearby.  You'll need it.
  • Let them have a little freedom and independence.  Give them the rolling pin and let them try.  Let them put a cookie cutter wherever they want.  Don't rush them, let them experience it.
  • Reinforce good listening by commenting on how they are following directions or working well with you.
  • I filled all four cookie sheets with cookies as we worked and put them in the oven after I cleaned her up.  It would be too hard to watch the oven and a messy, curious 2-year-old.  I found we both focused well doing this.
  • Have fun and take pictures.  Precious memories.


Check out our surprise box filled with other gingerbread boy activities.
Related Posts with Thumbnails