Please read, before reading

I am saddened by the comments on this blog that often take a judgmental turn. The information is intended to be just that -- information. You need to make your own decisions for your life and be accountable for your actions. I debated closing the blog, but feel there are many valuable items listed for families struggling with food allergies, especially early on.

If you need further information please contact a doctor. If you need to verify a product's ingredients, please look at current labels and contact the company yourself. Note many posts are several years old. Use your best judgment and do not make up comments to scare people.
Showing posts with label holidays. Show all posts

Sunday, January 20, 2013

Banana Swirl

We recently watched an episode of Daniel Tiger's Neighborhood.  There was a recipe for banana swirl.  They showed how to make it, but it seemed way to easy.  I had to give it a try.  Sure enough it is that easy.  I think it is a great option for food allergic people because it is one single ingredient -- Bananas. Granted you are no allergic to bananas.

Banana Swirl (aka banana ice cream)
2 frozen bananas

1. Freeze bananas for a few hours.
2. Place frozen bananas in blender. Blend on medium-low for about a minute or two.
3. The mixture will resemble ice cream in texture.
4. Add sprinkles, chocolate sauce or honey (or anything you think goes with bananas).

You will be so impressed with this -- you have to try it.  Enjoy!

Friday, April 6, 2012

Allergy-Free Jelly Beans

If you are looking for an allergy-free jelly bean that won't break your bank, check out Starburst Jelly Beans. There are several flavors and most bags are ranged from $1.50 to $2.50 and you can find them at just about any grocery store.


Nutrtional label here online.  As always double check the packaging to make sure there are no allergens listed.

Tuesday, February 1, 2011

Valentine's Day and Food Allergies

It's now been a couple years since our 3-year-old has been celebrating holidays with her food allergies to peanuts, tree nuts, milk and eggs.  Quite honestly, I don't really think too hard about what to do anymore.  I treat Valentine's Day very similar to Halloween,  Just insert hearts and cupids instead of pumpkins and ghosts. 

Here are a few other ideas for treats for Valentine's Day:
Remember it's only a big deal if you make it a big deal.  Also, if your children are young just baking something together is more important than the end result.  Valentine's Day is a holiday to show love and friendship -- not just to eat a lot of treats.

Saturday, November 20, 2010

Dairy-Free Thanksgiving recipes

Okay, I know many families worry that holiday meals just won't be the same if it isn't slathered in butter.  But you know what?  It's actually very simple to adapt a big fancy Thanksgiving meal to your allergy needs.

Here are some recipes and suggestions that work for us.

Turkey
12 lb turkey
Olive oil
2 Tbsp salt (I actually use a little less)
1 tsp poultry seasoning
1/8 tsp nutmeg
1/2 tsp dry mustard
1/4 tsp paprika

1. Mix seasonings together.
2. Rub olive oil and seasonings on turkey.
3. Stuff with stuffing (recipe below) if you want.
4. Bake per directions on packaging. (18 minutes per pound at 325 degrees)

Sausage Stuffing
3 Tbsp Olive oil
2 Tbsp dairy-free margarine (I use Earth's Balance)
2 medium onions
2 cloves of garlic
4 stalks of celery, diced
3 carrots, diced
salt and pepper to taste
1 bag of stuffing crumbs (I like Brownberry Herbed Seasoned Stuffing)
1/4 tsp poultry seasoning
1/4 tsp sage
1/2 pound pork sausage, browned and drained
2 cups chicken stock (homemade recipe here)

1. Heat olive oil and margarine in large skillet.
2. Add onions, celery, carrots.  Season with salt and pepper. Cook for 5 to 8 minutes. Add garlic for 30 seconds before removing from heat.
3. Combine stuffing crumbs, poultry seasoning, sage and pork sausage in large bowl.
4. Stir in chicken stock and cooked vegetables.
5. Stuff in turkey or bake in casserole dish at 350 degrees for 25 to 30 minutes.  I highly reccommend stuffing the turkey -- so good!

Mashed Potatoes
6 potatoes, diced
5 cups chicken stock (and more water if needed)
Pepper
Garlic, keep whole

1. Boil potatoes and garlic in chicken stock for 30 minutes or until potatoes are tender.
2. Drain potatoes, but save a couple cups of the stock in separate bowl.
3. Slowly add chicken stock to potatoes as you mash them.

**You can add soy or rice milk, but you don't need to to have some good flavor.**

Gravy
Brown bits from turkey
1/4 cup flour
2 cups chicken stock
1/4 tsp salt
1/4 tsp pepper
1 tsp thyme (optional)

1. Take brown bits from turkey and heat in skillet.  Add flour and mix together.
2. Slowly add chicken stock and cook on medium heat for 5 to 10 minutes until desired consitency.
3. Season with salt and pepper.


Cranberry Sauce
1 cup water
1 cup sugar
4 cups cranberries

1. Boil water with sugar.
2. Add cranberries and cook on medium heat until thickens.  About 10 minutes.

**Canned cranberries are dairy-free, too.**


Corn
I always save corn from the summer and freeze it for a simple dish.  I just heat it up and add a little dairy-free margarine and salt.  

**Personally, I don't see anything wrong with just heating up corn or green beans (either frozen or canned).  Why not have an easy dish?**


Dairy-Free Pumpkin Pie (sorry, not egg-free)
Last year I made two pumpkin pies.  This one and the recipe from on the back of the pumpkin can.  I had never made pumpkin pie before.  While the taste was a little different, we concluded that the dairy-free version was very, very good.


Crust
I cheat and buy Pillsbury refrigerated pie crust -- no dairy or soy

Pumpkin filling
16 oz can pumpkin
2/3 cup sugar
1 tsp ground cinnamon
1/2 tsp ginger
1/2 tsp nutmeg
3 slightly beaten eggs (not sure if egg substitute works here, sorry)
2/3 cup rice milk

1. Bake pie crust at 375 degrees in pie plate for 10 minutes before adding filling.
2. Combine pumpkin, sugar, cinnamon, ginger and nutmeg.  Add eggs.
3. Beat until just combined and stir in rice milk.
4. Pour filling into pie crust.
4. Bake at 375 degrees for 30 to 40 minutes
5. Cool on wire rack.

Saturday, October 23, 2010

Dairy-free, Egg-free Cut-out Cookies (plus frosting!)

I don't know where I found this recipe originally.  But it works out great for cut-out cookies.  I just couldn't wait to make them again until Christmas, so we made Halloween cookies.  I think I'm just craving cut-out cookies because they look so good in the grocery store bakeries.  I just don't trust those cookies for our little one.  The best part of these cookies is being able to let our daughter help.


Dairy-Free, Egg-Free Cut-out Cookies
1/2 cup dairy-free margarine (I use Earth's Balance)
1/2 cup shortening (I use Crisco)
2/3 cup sugar
1 tsp salt
1 tsp vanilla
1/2 cup applesauce
2 1/2 cup flour


1. Mix all ingredients except flour together.
2.  Slowly add flour.
3. Once mixed well, then wrap in cling wrap.  Refrigerate for a couple hours.
4.  Roll out dough and use cookie cutters to cut out shapes.
5. Bake at 375 degrees for 10 minutes.
--------------------------------------------------------------------


This frosting is amazing!

Dairy-Free Frosting
1 Tbsp melted dairy-free margarine (I use Earth's Balance)
1 tsp vanilla
2 Tbsp shortening (I use Crisco)
2 tsp vanilla soy milk
1 cup powdered sugar

1. Mix wet ingredients (all but powdered sugar) in mixer.  I like to use my Kitchenaid Mixer.
2. Slowly add powdered sugar.
3. Mix for 5 minutes on medium speed.

Wednesday, October 20, 2010

Halloween Treat -- Chocolate Pumpkins

I try to buy Wilton Candy molds (usually $2.50 at Michaels or Joann Fabric) for every season. You can't use the candy melts because they have dairy in them.   But I just use Enjoy Life Chocolate chips.  Then save the mold for next year.


I also buy those ice cube trays for each season and they work great for making chocolate candy.


Chocolate Pumpkins
1/2 cup Enjoy Life chocolate chips
1 Tbsp Dairy-Free margarine (I use Earth's Balance)
Pumpkin mold


1. Melt chocolate and margarine in microwave 30 seconds to 1 minute.
2. Stir and pour in mold.  You can use lollipop sticks, but you don't have to.
3. Place in freezer for one hour.
4. Store in refrigerator in air tight container.

**You can add mint extract, 1Tbsp Sunbutter or Soybutter or another type of extract to change the flavor.**

Tuesday, October 19, 2010

Halloween Treat -- Peeps

Our daughter just loves these and we buy them for every holiday.  They cost around a dollar and they usually last us a month or more.  We'll probably still have these pumpkins around Thanksgiving.  Easy.  Cheap.  Allergy-Free.

Monday, October 18, 2010

Halloween Treat -- Halloween Oreos

Am I a bad mother because our daughter didn't eat her first Oreo until last month?  I held off on Oreos and chips for as long as I could.  She now really likes both, really likes them.  That's what I thought would happen. It's great though because Oreos are a really cheap treat (search for coupons) and we can offer one as a special treat.  So today's Halloween treat is Halloween Oreos.  Yes, Dairy-Free, Egg-Free and Nut-Free.  Believe or not.  Sugar-Free, uh no.  Fat-Free, uh no.  But fun!

Sunday, October 17, 2010

Halloween treats -- Dairy-Free, Egg-Free, Nut-Free

I've read a lot of "Allergy-Free" blogs and see that many are posting online stores that sell allergy-free Halloween treats.  Well.  I look at the price and think it's just not worth when you tack on shipping (and the fact that a child might not like it or eat it all).  I get it's about providing fun treats for kids with food allergies and I greatly appreciate the effort and hope someday that we will just find these treats next to the bags of candy in the aisles full of dangerous candy. Maybe we'll get out own aisle someday.  But for now, I choose to find what is available and safe to eat and work with.

All this week I will be sharing Halloween treat ideas that don't take a lot of time, are cost effective and lots of fun to eat.  Hold on to your seats but many of the items I will share will be (big sigh) processed foods.  Guess what I think it's okay in moderation, especially during the holidays.

Today's Fun Halloween Treat is:


Halloween Trail Mix
(You can use any variation of cereal, dried fruit, pretzels, etc. -- make it your own)

1/4 cup Cheerios
1/4 cup Kashi Heart to Heart Cereal
1/4 cup Kashi Honey Sunshine
1/4 cup Cinnamon Toast Crunch (I sent my husband to the grocery store to get a General Mills deal and he brought this home for snacks)
1/2 cup Craisins
2 Tbsp Enjoy Life chocoalate chips
leftover Teddy Grahams (I think there were five left and a few arms and leg pieces)
2/3 cup Ghost Marshmallows
1. Simply mix all ingredients together.  I always let my daughter pour them in a large bowl and stir with wooden spoon.
2. Store in zip lock bag or air tight container.

**My daughter told me that the Craisins were spiders and the teddy grahams were puppies (dressed in costumes I presume).  It doesn't take much to turn something into something else.  Plus when you're 3 years old everything is a great idea. **

Saturday, July 3, 2010

Fourth of July Marshmallows

I adapted this idea from here.  I'm not nearly that patient talented to make those amazing treats.  But we were able to make the marshmallow part.  Note our daughter did this one by herself!!  I think my toddler is turning into a preschooler!

Fourth of July Marshmallows

Large Marshmallows
Red sugar sprinkles
Blue sugar sprinkles
water
toothpicks
3 small containers

1. Fill each container.  One with the red sprinkles, one with blue sprinkles and one with about 1/2 of water.
2. Put toothpick on top of marshmallow. This is what you will hold onto to dip your marshmallow so you don't get too sticky.
3. Dip marshmallow in water.


4. Dip in blue sprinkles.
5. Use the same toothpick and put it through the top of the blue sprinkles.


6. Dip unsprinkled side in water and then red sprinkles.


**We made this for afternoon snack and our daughter ate it faster than you can imagine.  I guess you can't get better than sugar and marshmallows (except if only chocolate was involved, hmm there's an idea in waiting)**

For more recipes (not neccesarily dairy-free) go the Grocery Cart Challenge and Life as Mom!

Monday, April 5, 2010

Dairy-Free Easter Meal

I'm always interested what other people make for holiday meals.  I'm even more interested on how people make them allergy-free.  We are pretty simple people.  We don't make too many fancy meals.  Here is what we served for Easter dinner.  All is dairy- and nut-free, however two items are not egg-free.  I made the rolls and carrot cake the day before making it very easy the next day to just pop the ham in oven and make the rice.  And heating up green beans took a couple minutes.


  • Ham - pour can of slice pineapple over ham, roasted for 25 minutes per pound at 325 degrees (I keep a couple slices to the side for our toddler to eat with the meal)
  • Rice- white rice and wild rice mixed together
  • French-Style Green Beans - canned
  • Pull apart Rolls (not egg-free)
  • Carrot Cake (not egg-free)


**Alternatives: Hot Cross Buns, potatoes (with dairy-free butter), any vegetable, dairy-free desserts

Saturday, March 27, 2010

No dying of eggs here!

We are still uncertain if our daughter has an egg allergy.  I just haven't had the heart to do the blood test.  Her last skin test was questionable in August, so I figured we just wait until she's 3 and do extensive testing then.  With that said, we don't want to endanger her with dying Easter eggs.  Instead, we painted wooden eggs.  You can find them at a craft store and maybe even Wal-Mart.  Remember just because food allergies limit us, that doesn't mean there aren't options.

First we painted the wooden eggs with white tempera paint and let them dry overnight.  They actually were dry within an hour, but painting with a toddler is a process, to say the least.


The next day, we picked paint colors and painted the eggs.  I gave our daughter the freedom to do whatever she wanted.  I did encourage her to use many colors on the last egg (she even used two brushes at the same time).  The first two eggs she painted were just one color each.

Wednesday, March 24, 2010

Allergy-Free Easter Treats

Oh, it's so hard to figure out what to do for holidays for a food allergic toddler.  I envy the people that just buy a couple bags of candy and an chocolate bunny without thinking.  With food allergies you have to be a little creative.  It's good to exercise that muscle.

Here are some of my ideas for this year's Easter Basket.

(in photo)
  • Fruit Snacks (these are pretty much candy in my book)
  • Chocolate eggs (I'll adapt this recipe into an egg mold)
  • Chocolate suckers (bought an Easter mold at Michaels and will simply melt Enjoy Life chocolate chips)
  • Enjoy Life Candy bar (find coupon here)
(not in photo)
  • Marshmallow Peeps (so far these have been safe for her)
  • Homemade gummy snacks (check out recipe here!)


**Note that even when we have holiday treats, I tend to spread the snacks out over time.  We still have Heart Peeps in our pantry (not sure if they will be gone by Easter).

Thursday, December 3, 2009

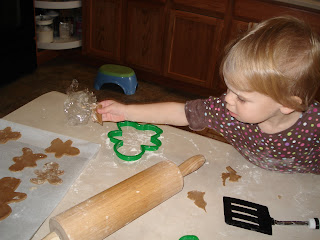
Dairy-free and Egg-Free cutout gingerbread cookies


It's so hard to find tasty baked good recipes for everyone.  It's just too much work to make two sets of cookies dairy-free and regular dairy-based cookies.


I found a really good recipe for cut out gingerbread cookies that do not have milk, butter or egg in them.  Yes, you can taste what's missing.  But once you add the frosting, it balances out really well.  What I most liked about this recipe is that the dough was really easy to work with and that my 2-year-old could help me with no worries.  Hooray!  I also liked that this recipe didn't have any odd ingredients that I would have to purchase.


Cutout Gingerbread Cookies
(original recipe found here)

2 cups flour
1 1/2 tsp cinnamon
1 1/2 tsp ground ginger
1/2 tsp ground cloves
1/2 cup shortening (I use Crisco)
3/4 cup brown sugar
6 Tbsp hot water (I just have a measuring cup full of hot water and scooped out Tablespoons as needed)
1/2 tsp baking soda

1. In large bowl, mix flour, cinnamon, ginger and cloves.  Mix with fork or whisk. Set aside.
2. In mixing bowl add shortening, brown sugar and 3 Tbsp hot water. Mix in mixer on medium.
3. In a cup mix 3 Tbsp hot water and baking soda. Add to shortening mixture.
4. Add flour slowly to shortening mixture.
5.  You may need to add more hot water if dough is crumbly.  I added about 3 Tbsp more.
6. Split dough in half and make two thick patties. Wrap in plastic wrap for 1/2 hour to 1 day.  (I made my dough after making dinner one night and we rolled it out the next morning -- worked out really well.)
7. Roll out dough on lightly floured surface.  Use cookie cutters to make shapes.
8. Place cookies on parchment lined paper.
7. Bake at 350 degrees for 8 minutes or until done.


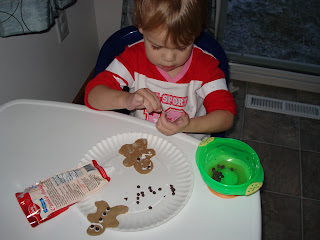
**For frosting these I just bought a Betty Crocker frosting tube and used Enjoy Life chocolate chips for the eyes and buttons.**


Cooking with a Toddler Tips:

  • Be prepared.  Have a game plan in mind.
  • Do as much prep work ahead of time before telling your toddler you're ready for them.  Have everything ready -- line cookie sheets, clean cookie cutters, clear work space.
  • Plan for it to take longer than you anticipate (and it should if your toddler or child is actually helping).
  • Give them a job right away.  As I dusted the counter I had her move the flour around.  As I was moving the cookies to the cookie sheet, I gave her dough to manipulate.   Keep finding little jobs so they don't get bored.
  • Don't get upset as you watch them brush flour on the floor.  It can get cleaned up.
  • Have a wet paper towel or washcloth nearby.  You'll need it.
  • Let them have a little freedom and independence.  Give them the rolling pin and let them try.  Let them put a cookie cutter wherever they want.  Don't rush them, let them experience it.
  • Reinforce good listening by commenting on how they are following directions or working well with you.
  • I filled all four cookie sheets with cookies as we worked and put them in the oven after I cleaned her up.  It would be too hard to watch the oven and a messy, curious 2-year-old.  I found we both focused well doing this.
  • Have fun and take pictures.  Precious memories.


Check out our surprise box filled with other gingerbread boy activities.
Related Posts with Thumbnails